Integrating Bomgar and Jamf Self Service
To me, what follows didn’t seem overly remarkable, until I shared it in #jamfnation on the MacAdmin’s Slack. I received some great feedback and was encouraged to share what I did with the wider community. I honestly didn’t think it would be that useful to as many people as it was.
We use Bomgar to give our staff and students an easy way to get help when they need it, be that on their Windows PCs, Macs or even Android tablets. Unfortunately, the user’s journey with Bomgar on a Mac is something like this:
- Click a URL that takes you to an online form.
- Fill in that form with details about your issue.
- Download a Disk Image (DMG) containing the Bomgar client.
- Open/mount the DMG file.
- Open your mounted Disk Image and run the Bomgar application.
Not great and full of manual steps that a lot of people will find challenging or frustrating, especially in situations where they need help quickly to resolve their issues. It’s a faff and faffing is bad. There has to be a better way. And our students and staff love using Jamf Self Service.
It began with NoMAD
At this point, I give a well-deserved nod to the open source application NoMAD. If you’re in an Active Directory environment and you have Macs, you owe it to yourself to check it out, if you don’t know it already. Specifically, NoMAD has nifty Bomgar integration - you click a menu item and the Bomgar client magically downloads, launches and establishes a session. I gotta get me some of that! So, let’s dig into the code!
The good stuff is in here, the Swift class that deals with the Get Help menu item. The Bomgar specific stuff is this:
cliTask("curl -o /tmp/BomgarClient " + myURL )
cliTaskNoTerm("/usr/bin/unzip -o -d /tmp /tmp/BomgarClient")
cliTask("/usr/bin/open /tmp/Bomgar/Double-Click\\ To\\ Start\\ Support\\ Session.app")
Looks like the stuff in brackets can be run in a shell script, which is good. So let’s see what each line does.
- Use the curl utility to download the Bomgar client (myURL is a variable which contains the arguments for curl to send the correct data to your Bomgar server, using the Bomgar API. More on that in a moment…
- Unzip the Bomgar client.
- Run the unzipped Bomgar client application, and make the magic happen.
Curling one off
The fun bit is working out exactly what to tell curl to download and what to tell curl to tell your Bomgar server, so it downloads exactly what you want:
- A zip file containing the client (not a DMG file!).
- The right settings for your environment baked into the downloaded client.
Help is at hand, in NoMAD’s documentation, here. Specifically, this bit, which specifies using the defaults command to set the myURL variable for NoMAD as a preference:
'"https://bomgar.company.com/api/start_session -A \"Mozilla/5.0\\ (Macintosh;\\ Intel\\ Mac\\ OS\\ X\\ 10_11_4)\\ AppleWebKit/601.5.17\\ (KHTML,\\ like\\ Gecko)\\ Version/9.1\\ Safari/601.5.17\" -d issue_menu=1 -d session.custom.external_key=NoMAD -d session.custom.full_name=<> -d session.custom.serial_number=<> -d customer.company=<>"'
The -A argument is the User Agent - the browser and operating system curl pretends to be. It turns out that simulating Safari on OS X 10.11.4 makes the Bomgar server give us back a zip file containing the client application. Every other User Agent I tried resulted in getting a DMG instead.
Check out the -d arguments. Each one tells the Bomgar server something specific, in accordance with Bomgar’s API, so the session can be launched exactly how you want it to be. For our setup, it turned out that we needed to supply these:
issue_menu
codeName
issue_menu should always be set to 1, end of.
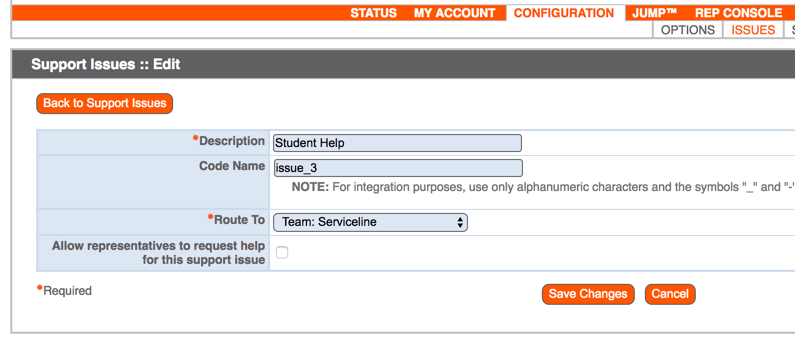
codeName specifies the Bomgar-specific Issue Code that your session will use, so it gets routed to the team/queue it needs to go to. It wasn’t in NoMAD’s source or documentation. I had to figure that one out for myself. According to the API reference, leaving it out makes the session connect to the default queue. In our case, it meant a black hole and our service desk staff were unaware of the incoming session.
You can get its value by logging into the admin interface for your Bomgar server, clicking the CONFIGURATION menu, then choosing ISSUES. Click on the Issue you want to route your sessions to and you’ll see its Code Name, like this:
A Script fit for Self Service
The next step is to get everything into a script. Here’s one I made earlier, which has a couple of variables you can edit for your Bomgar server URL and Issue Code - just change those to your liking:
https://gist.github.com/neilmartin83/307fe3798515f3f548217c4649e59f57
You’ll notice a lot of ‘su-ing’ in there and a really long bit of Python (thanks to Macmule for that one!). That’s because this script will be run by a Jamf Self Service policy, and so runs as the root user. It needs to run each command in the context of the currently logged in user, so that’s why we do this - work out who that user is, then do the magic as them.
Once that script is in your JSS Jamf Pro Server, simply create a policy for Self Service that runs it. Job done.
What does it look like from the user’s perspective when it’s working? This! Our service desk was closed when I recorded it, but you get the idea…
https://youtu.be/exkAzJ2ikn0